Omap Boot Procedure

twl4030

root/drivers/gpio/gpio-twl4030.c
http://www.ti.com/tool/twl4030sw-linux

Linker

TI Linker Command File Primer
Linker CMD Files for CCS

Kernels

Preloader and U-Boot Customization - v13.1
Fast Boot Linux with u-Boot Falcon Mode
Preparing a Uboot image for Altera’s Cyclone V SoC FPGA

Repack kernel

1
2
3
4
./umkbootimg '/home/lukas/SamsungP5100/BootImg/boot.img'
./unpack_ramdisk initramfs.cpio.gz
./repack_ramdisk ramdisk_ initramfs.cpio.gz
./mkbootimg --kernel zImage --ramdisk initramfs.cpio.gz --base 0x80000000 --cmdline 'console=ttyO3,115200n8 mem=1024M androidboot.console=ttyO3 vram=20M omapfb.vram=0:16M' -o new_boot.img

AnyKernel2 - Easily Mod ROM Ramdisk + Pack zImage

https://github.com/osm0sis/AnyKernel2

[KERNEL] [UNIFIED] Anykernel

https://wiki.lineageos.org/devices/espresso3g/build

https://github.com/LineageOS/android_device_samsung_espressowifi

[DEV][WIP][OS] Ubuntu Linux on Galaxy Tab 2 GT-P31xx

Boot Arguments

Passing Kernel Arguments

Ramdisk

Understand U-Boot memory footprint

Android Boot and Recovery Images

http://omapedia.org/wiki/Support_Tools

https://www.digikey.com/eewiki/display/linuxonarm/PandaBoard

9.5 U-Boot

TI Booting Linux kernel using U-Boot
Linux Core U-Boot User’s Guide

NookTablet

https://github.com/Ar2000jp/u-boot

[MOD]UART Debugging Connection

Partitons, Functions, Security, Hardware, Kernels and Methods

The First bootable SDCard for Nook Tablet

Say hi to “CyanoBoot” – a 2nd bootloader/w menu aka “ub2”

CyanoBoot for Nook Tablet Released

U-boot for NookTablet

https://github.com/succulent/acclaim_recovery_sdcard

How to Guide: Bootable (CM7/CM9/CM10) SDCard for Nook Tablet

https://iamafanof.wordpress.com/2012/05/17/how-to-guide-dual-boot-cm7cm9-sdcard-for-nook-tablet/

https://iamafanof.wordpress.com/2013/02/18/cm10-1-jellybean-android-4-2-2-for-nook-tablet-0218/

Dual-Boot SDCard | CM7.2 Source | Guides | Recovery | Stock 1.4.2

BCB, BootCnt, and the bootdata partition

[DISCUSSION] on the boot loader [CRACKED!]

Bootloader cracked and next steps

[UNBRICK] Repartition, Reformat, Restore and Rescue SDcard

B&N repartition SD card Boot

https://forum.xda-developers.com/showthread.php?t=1517513&page=3

Search: Posts Made By: bauwks

https://forum.xda-developers.com/search.php?searchid=452174729

https://patchwork.kernel.org/patch/7681601/
https://training.ti.com/linux-board-porting-series-module-4-linuxu-boot-source-code-structure
https://forum.xda-developers.com/nook-hd/development/hd-boot-v2014-07-boot-scripting-t2888098
https://forum.xda-developers.com/galaxy-s2/general/uboot-bootloader-true-multiboot-t1680898
https://forum.xda-developers.com/galaxy-nexus/development/bootloader-boot-multi-boot-support-t2201146

http://omappedia.org/wiki/4AJ.2.5_OMAP4_Jelly_Bean_Release_Notes

http://xillybus.com/tutorials/uboot-hacking-howto-1

https://rocketboards.org/foswiki/Documentation/PreloaderUbootCustomization131

Fixing Samsung Galaxy Tab Broken Cable Charger
U-boot for the multi-boot support

UnBrick Samsung Galaxy Tab

There are more possibilities how to repair Hardbrick Samsung Galaxy Tab 2:

  • For those who damaged boot loader can try Running stock U-Boot from SD Card
  • For those who have HW fault like eMMC bug can participate on development Running entire system from SD Card
    The second one may be solve later with help of some experienced people from hire.

Run stock U-Boot from SD Card

Requirements

  • Hardbrick Samsung Galaxy Tab 2 (GT-P5100). can be recognized that it don’t do nothing, charging not working, power button do nothing, recovery not working. More info How To Unbrick Your Galaxy Tab!
  • SD Card Support UHS-I UHS104 (SDR104), with is not easy to determine with Card support this format and with not. I tried meny cards and label UHS-I is not enough so I asked SanDisk support they recommended SanDisk Extreme. I bought SanDisk Extreme 32GB, and this card is working. I would say that every card 90MB/s+ should work.

step 0 not for linux

Windows

step 1

Windows & Linux

step 2

Prepare SD card

Windows

Use win iso burner to write Debrick dump imgs to Sd Card.

Linux

Write Debrick dump imgs to Sd Card.
Be careful to use right device sdX

1
root@lukas-debian:/home# dd bs=4M if=debrick.img of=/dev/sdX status=progress conv=fsync

step 3

In Linux Run

1
root@debian:/home/lukas/SamsungP5100/omapboot# python3 omapboot.py -b

you will see:

1
2
3
4
root@debian:/home/lukas/SamsungP5100/omapboot# python3 omapboot.py -b

Boot from MMC1 interface selected.
Waiting for omap44 device.

  • Connect Tablet to PC
  • Press Power button for long time approximately 10s
  • You should see this in command line:

    1
    2
    3
    4
    5
    6
    7
    8
    9
    10
    11
    12
    13
    14
    15
    16
    17
    18
    19
    20
    Boot from MMC1 interface selected.
    Waiting for omap44 device.
    Model: 4430
    ROM revision: 0x04
    CH: enabled
    Underdocumented ASIC subblock #18: 00
    IDEN: 0xE5FD23CE0F5FDF902D7EDA9B4D848D687F62372A
    MPKH: 0xB585ACF1DD15B06A74813BFDDD6ECD64227CE4C90658C65B4C53AC229B4C6DC0
    CRC0: 0x9C669AD9
    CRC0: 0x682ADCCF
    recevied ASIC ID banner:
    Model: 4430
    ROM revision: 0x04
    CH: enabled
    Underdocumented ASIC subblock #18: 00
    IDEN: 0xE5FD23CE0F5FDF902D7EDA9B4D848D687F62372A
    MPKH: 0xB585ACF1DD15B06A74813BFDDD6ECD64227CE4C90658C65B4C53AC229B4C6DC0
    CRC0: 0x9C669AD9
    CRC0: 0x682ADCCF
    Giving x-loader a chance to come up...Probably loaded!
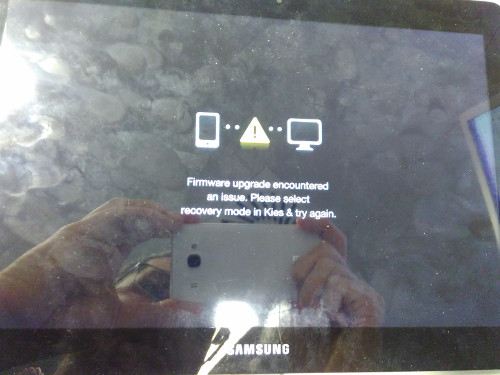
  • Tablet should start to some firmware recovery mode see picture 1

  • You should be able to use ODIN to repair internal memory, in my case ODIN stop in the half of loading, I probably have eMMC bug.

Running entire system from SD Card

I’m trying to modify U-Boot and Kernel to load entire system from SD Card. Some have done it Say hi to “CyanoBoot” – a 2nd bootloader/w menu aka “ub2” different device same CPU.

First step of boot is loading x-loader. The x-loader is signed so we have to use original one from Samsung. After some peripheral initialization x-loader copy u-boot to ram checking for magic constant as copied code and execute it. This is the place where we can change u-boot to boot from SD Card, because x-loader load u-boot from the same device as was loaded him.

u-boot source

Do anyone have u-boot source from Samsung?
I used this Guide and copy something from Nook device u-boot source because they made boot from SD Card on same CPU OMAP4430. And lge_p920 from LG Open-source repository. Do anyone have better idea?

How to compile

u-boot source
Building U-BOOT #(for Blaze)

Kernel

I’m using Stock boot.img from O2C-P5100XXDMJ2-20131203002840.zip package.

Prepare Debrick.img

Rewrite part of Image Files

Write recovery.img to specific address in debrick_changed.img address 0x2C00000 write in hex or dec depend on system (seek=$((0x1800000)) for linux) (seek=46137344 for Windows).
You need to rewrite:
x-loader (MLO) 0x20000
u-boot (Sbl.bin) 0x1800000
boot.img 0x2400000
recovery.img 0x2C00000

1
dd if=C:\temp\Tablet\sdCardDebrick\recovery.img of=C:\temp\Tablet\sdCardDebrick\debrick_changed.img seek=$((0x1800000)) oflag=seek_bytes conv=notrunc

UART Debugging

Pin 21 of Samsung Galaxy Tab 30 Pin Dock Connector Pinout is output of debug messages for x-loader and u-boot (port UART4). I would like send Kernel debug output to this port. Anyone know how to do it?
I’m using UB232R for conecting to PC.

[TOOL] Boot.img tools [unpack, repack, ramdisk]

[HOW TO] BOOT FROM SD CARD [SUCCESSFULLY] on QMobile Z8 with BRICKED/DEAD eMMC

[TOOL] Android Image Kitchen - Unpack/Repack Kernel Ramdisk [Win/Android/Linux/Mac]

Samsung Galaxy Tab GT-P1000

How To Unbrick Your Galaxy Tab!

P1000 GTab Dev Platform AKA UnBrickable Mod And Software Resurection

ModeDetect USBID Detector

Unbrick using OMAP flasher

OMAPFlash recovery p5113

Samsung Galaxy Tab 2 GT-P5100

eMMC Firmware

Unbrick using OMAP flasher

[Pit][Pit Files][For All Samsung Tab 2 Tablets][Updated-Op]

An alternative for Tab 2 emmc bug & brick backup

Samsung Galaxy S II GT-I9100G

Repair Totally Sleep/Dead Boot Mode Via USB

omap4430hs_espresso_Inter i910

Unbrick dead Samsung GT-i9250 Galaxy Nexus, GT-I9100G , GT-I9300

Octopus Samsung/Octoplus Samsung

[Galaxy S III][IMPORTANT] GT-I9300 Hard Brick Fix

Samsung Galaxy Nexus

So I bricked my GNEX…Then brought it back to life!

Nexus brick. OMAP Flash Tutorial in post 10

LG

u-boot / omap4boot for P920/P720/P940 and its variant

TI OMAP4430

Android gingerbread eMMC booting

search for OMAP Flash Loader (Media:omapfl-1.0.tar.gz)
OMAP Flash Recovery Utility

Projects

https://www.tomshardware.com/reviews/amazon-kindle-fire-review,3076-9.html

https://e2e.ti.com/support/legacy_forums/omap/f/849/p/216054/772552

https://wiki.phytec.com//display/public/PRODUCTINFO/phyCORE-OMAP44xx

http://www.ti.com/general/docs/wtbu/wtbuproductcontent.tsp?templateId=6123&navigationId=12843&contentId=53245

UnBrick the UnBrickable Captivate Samsung

https://github.com/dmarszk/hummingbird-hibl/releases

http://omappedia.org/wiki/Omapboot

https://github.com/aneeshv/omapboot

https://github.com/swetland/omap4boot

https://github.com/swetland/omap4boot

omapboot Python

JOdin3 CASUAL Cross Platform and Web-Based Flashing For Samsung Phones

https://training.ti.com/sites/default/files/docs/AM57x-DFU-boot-SLIDES.pdf

https://github.com/thalamus/omap-x-loader

http://omappedia.org/wiki/4AJ.2.5_OMAP4_Jelly_Bean_Release_Notes

http://processors.wiki.ti.com/index.php/Boot_Sequence

http://processors.wiki.ti.com/index.php/How_to_Make_3_Partition_SD_Card

Create your own MLO for a BeagleBoard XM

http://git.ti.com/ti-u-boot/ti-u-boot

Heimdall

Heimdall is a cross-platform open-source tool suite used to flash firmware (aka ROMs) onto Samsung Galaxy S devices.
Heimdall gitlab

https://www.hardreset.info/devices/samsung/samsung-p5100-galaxy-tab-2-101/faq/firmware-flash/
Firekit LiveUSB repair kit 1.1- when you’re about to kill Windows

VirtualBox

##############################################################################
#

PART I - BEFORE YOU START

#
##############################################################################
Make sure VirtualBox has been installed and your VMs can be started from VirtualBox Manager without any problem. Shutdown all the VMs and close VirtualBox Manager.

IMPORTANT: If you want to control your VMs with VRDP, enable remote display at display settings and assign a dedicated port for each individual VM (e.g. use: 3010 for Vm0, 3020 for Vm1, etc.). Do not use the standard port 3389, which is used by your host machine!

##############################################################################
#

PART II - INSTALLATION

#
##############################################################################

Step 1. Run the VBoxVmService setup program as Administrator

Step 2. Open up VBoxVmService.ini in installation folder and modify it to fit your needs. The file contains an example setup with two virtual machines.

Key / Value pair Description

[Settings]
VBOX_USER_HOME=C:\Users\YOUR_NAME_HERE.VirtualBox The actual path to your user’s .VirtualBox directory. It is usually located in your users’ personal folder.
RunWebService=no Whether or not start up VBoxWebSrv.exe, the VirtualBox HTTP web service automatically. Could be “yes” or “no”. Leave it to “no” if you don’t know what it is.
WebServiceParam= If necessary, you can specify additional parameters for VBoxWebSrv.exe, like “–port” for binding to non-default port.
PauseShutdown=5000 A pause parameter to slow down the Windows shutdown process and to prevent VMs from crashing on shutdown/reboot. (5000 = 5 seconds) Note Windows has a limit to how long the service controller could wait when system reboots. The time limit is specified in the WaitToKillServiceTimeout value of the following registry key: HKEY_LOCAL_MACHINE\SYSTEM\CurrentControlSet\Control. Your PauseShutdown value should never exceed this time limit.

[Vm0]
VmName=ubuntu The name of the VM to start (case sensitive!)
ShutdownMethod=savestate The shutdown method (“savestate”, or “acpipowerbutton”). When “savestate” is used, the machine state is saved and will be resumed when you start VM next time. When “acpipowerbutton” is used, as long as client OS support it, the VM will get a clean shutdown. If your VM takes long time to poweroff, it’s recommanded to use savestate, which could be done very quickly.
AutoStart=yes Whether or not this VM will be started automatically, when VBoxVmService runs. Default to “yes”.

[Vm1]
VmName=winxp As you can see, the above values almost repeat for every [VmX] section of the file.
ShutdownMethod=acpipowerbutton
AutoStart=no This VM will not be started automatically.

Step 3. Reboot your system.

If everything goes on right, you could now connect to your VMs with VRDP clients (or ssh clients, if you’ve configured ssh server inside your VM). If not, refer to TROUBLESHOOTING section below for how to debug.

##############################################################################
#

PART III - UNINSTALL

#
##############################################################################

Step 1. Stop running VBoxVmService service. Run VmServiceTray.exe to stop VBoxVmService, then exit VmServiceTray.exe.

Step 2. Open Control Panel -> Programs, select Uninstall VBoxVmService.

##############################################################################
#

PART IV - TROUBLESHOOTING

#
##############################################################################
If the service does not bring your VMs up as desired, try the following steps:

Setp 1. Check config file.

Carefully re-check the settings you made in “VBoxVmService.ini”.

Setp 2. Debug with VmServiceControl.exe.

Switch to a command prompt, cd to the VBoxVmService directory and type:

VmServiceControl.exe -l   [ENTER]

to list all the VMs you configured in “VBoxVmService.ini”, and their current states.

If something goes wrong, reduce the number of VMs in your ini file to one (= only have the section [Settings] and the section [Vm0] in your ini-file) in your ini-file, for debugging.

The command:

VmServiceControl.exe -su 0   [ENTER]

can be used to bring up the VM you set up in the section [Vm0] of the “VBoxVmService.ini” file.

If you have successfully started a VM, you should end up with a “VBoxHeadless.exe” process, running as the impersonated user (check in task manager).

The command:

VmServiceControl.exe -sd 0   [ENTER]

can be used to stop the VM targeting [Vm0]. Afterwards, there should be no running “VBoxHeadless.exe”-process. Additionally, you should see a “VBoxSVC.exe”-process terminating shortly after a successful shutdown of “VBoxHeadless.exe”.

Step 3. Read the log files

The file VBoxVmService.log logs everything imortant to VBoxVmService, like all commands it received, and their results. If something went wrong, you can find error code and/or message there.

If you see error like “Could not find a registered machine named…”, check if the environment variable VBOX_USER_HOME has been setup correctly.

If you made a mistake on VBOX_USER_HOME, however, fixing it at VBoxVmService.ini is not enough. Because the value was get written into environment variable during installation. You’ll need to uninstall VBoxVmService first, then install again.

After installation and everytime when you changed VBOX_USER_HOME later, a system reboot might be required to get VBoxVmService work correctly. So give it a try if you haven’t.

If you can’t see any error in VBoxVmService.log, but the VM just don’t run as expected, check if something goes wrong from VirtualBox’s own log, which is saved to file VBoxSVC.log under your VBOX_USER_HOME folder.

Step 4. Ask for help

Refer to the project wiki at https://github.com/onlyfang/VBoxVmService/wiki or https://github.com/onlyfang/VBoxVmService/issues for a list of known issues.

If you are still in trouble, you are welcome to create a support ticket at https://github.com/onlyfang/VBoxVmService/issues. Please be sure to include your VBoxVmService.ini and VBoxVmService.log, so that we can help checking what might be wrong. We might be on VirtualBox’s official forums now and then, so feel free to contact us there, too.

The VBoxVmService Development Team
Mattz, FB2000 and Runar